How To Create A Javascript Project
JavaScript seems to be everywhere these days. Until now, I only used it when the need arose while doing front-end web development, but recently, I wanted to learn the language more properly. So the next question that popped into my mind was which IDE or editor has the JavaScript auto-complete / IntelliSense and debugging capabilities? I was already familiar with Visual Studio, so I wondered if I can just use that for this purpose. It turns out you can and this is the topic of this article.
The first half of the article will show, how to create a front-end JavaScript HTML web project in Visual Studio, and in the second half, we will add HTML and JavaScript code to create a simple web application.
Step 1 – Create a new Web Site
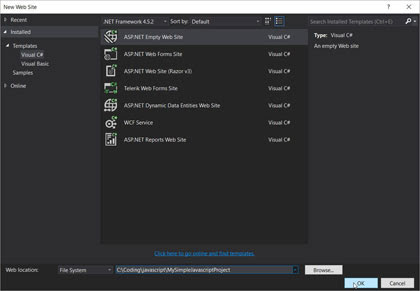
I first tried to find a template for JavaScript Project in Visual Studio, but I didn't find any. So I created an Empty Web Site project instead.
The steps are as follows:
- In Visual Studio, go to File > New > Web Site
- A window named "New Web Site" will open. On the left side, select Templates > Visual C# or Visual Basic, and then choose "ASP.NET Empty Web Site" Template from the list of templates.

Click image to enlarge
- At the bottom of the same window we choose "Web location" for our project. We can choose between File System, HTTP, FTP). I used a File System.
- Choose the location of the project and Click OK.
A new project will be created. In Solution Explorer, you will notice the project will be empty except for a single file named web.config. This file is a configuration file for the ASP.NET web application. We won't use ASP.NET here, but we still need web.config file to have debugging enabled.
In the next step, we will create a HTML, CSS and a JavaScript file.
Step 2 – Adding new items to the project
First we will add a new HTML page.
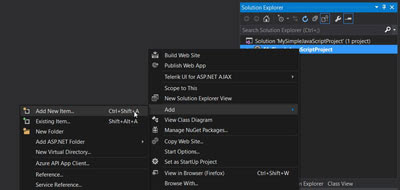
- Right-click on project in Solution Explorer
- A context menu will appear. Select Add > Add New Item as shown below:

Click image to enlarge
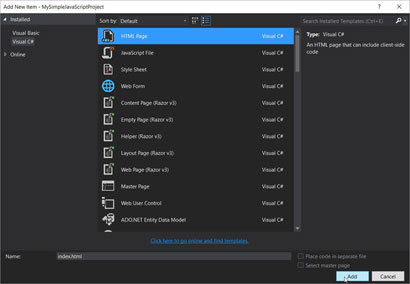
- An "Add New Item" window will open with different items to choose from.

Click image to enlarge
- Select "HTML Page" and give it a name
index.html. - Click on Add.
The created HTML file will contain basic HTML elements.
Now let's add a CSS file. We will add a few styles to it to make the page look better. Repeat the steps as before, but at step 4, select "Style sheet" and let's name it style.css and Click OK. The created file will contain a <body> selector with no declaration.
All that is left is to add a new JavaScript file. Again repeat the steps 1 to 3 and for step 4, select a "JavaScript File" instead. Give it a name hello.js and click on Add. The created JavaScript file will be empty.
And this is how you can create a JavaScript project using Visual Studio.
Note: When adding a new item by right-clicking on the project name and choosing "Add", at the bottom of that context menu we can select common file types such as HTML, CSS, and JavaScript directly without the need to use Add New Item option.
And now a few words about Debugging.
Debugging JavaScript with Visual Studio
I thought the debugging of JavaScript in Visual Studio would be straightforward. Unfortunately, debugging only works when you run the project in the Internet Explorer browser. It doesn't seem to work with any other browser. While learning plain JavaScript, this should not be an issue, but when you start to add libraries and frameworks, it might become a problem.
Step 3 - Creating a simple Web JavaScript Project
In the rest of the article, we will create a simple web page that uses JavaScript for its functionality. It is as basic as it can be, but it might be a useful starting point for those not that familiar with JavaScript. We will create a web page, where the user enters their name into the input field and after submitting, the page will greet you using the submitted name as shown below:

So let's begin adding the necessary code to the files we created.
Adding code to the HTML file
Open HTML file index.html and add this code inside the <body> tag:
<form> What is your name: <input type="text" size="20" id="myname" /> <button type="button" id="mybutton">Submit</button> </form> <div id="hellomessage"></div> Quick code explanation
Let's examine the above code more closely by focusing on yellow highlighted lines 2, 3 and 5:
Include JavaScript file inside HTML page
There is one more step before we finish with our HTML file. We need to reference our created hello.js javascript file inside the index.html. This will cause the JavaScript file to load, when the index.html runs. We achieve this by adding the following line before the ending </body> tag.
<script src="hello.js"></script> But Why there and not in the </head>? Because by placing it at the end of the <body> tag, we ensure that objects in HTML are loaded before any code in JavaScript file references them. For more information about where to include JavaScript files, check this article from 2008.
Note: We can also add the above code by simply dragging the hello.js file from Solution Explorer into the opened index.html file.
And we are done with index.html. This si the entire code:
<!DOCTYPE html> <html> <head> <title></title> <meta charset="utf-8" /> </head> <body> <form> What is your name: <input type="text" size="20" id="myname" /> <button type="button" id="mybutton">Submit</button> </form> <div id="hellomessage"></div> <script src="hello.js"></script> </body> </html> Now let's turn our attention to the hello.js file.
Adding JavaScriptcode in hello.js file
If not already opened, open hello.js by double-clicking on the file in Solution Explorer and add the following code:
function ShowHelloMessage() { var name = document.getElementById("myname"); document.getElementById("hellomessage").innerHTML = "Hello, " + name.value; } document.getElementById("mybutton").onclick = ShowHelloMessage; Here, we created a function named ShowHelloMessage (lines 1-4) and that function is then referenced in line 5. Let's examine this in more detail.
With the above code, the "hello message" is displayed only when button is clicked, but not when enter key is pressed. Let's fix that next.
Adding support for "enter" key
There are several ways to achieve this. Here is a quick solution that requires changes of HTML file in two places:
- Inside our
<input>field, we add onkeydown event that executes a code every time a user presses a key. The modified code for<input>would look like this:<input type="text" size="20" id="myname" onkeydown = "if (event.keyCode == 13) document.getElementById('mybutton').click()" />The code inside the onkeydown event checks if enter key has been pressed and if so, click() method is called on our button. The click() method is used to simulate a click event.
- Since we only have a single input field, the click event in previous step will simulate a "submit" click, which is not what we want. To prevent this from happening, we can simply add another input field and hide it, like so:
<input type="text" style="display: none;" />
And we are done. Now, if you simply press enter key after typing a name, it should have the same effect as if you clicked on a button.
Adding some CSS styles
Now let's style the page a little using CSS. We already added the style.css file into our project, we just need to reference that file inside index.html, so open the index.html and add the following code inside the <head> tag:
<link href="style.css" rel="stylesheet" /> You can also drag and drop the style.css file inside the opened index.html file and the above code will be created by Visual Studio automatically.
Now let's add some style rules. Inside the style.css, add the following:
body { font-size:1em; font-family:Arial; background:#eee; } #hellomessage { font-weight:bold; } The finished JavaScript application in action
And we are done. You can test the whole code below:
See the Pen Very Simple JavaScript innerHTML Example by HowToDevCode (@HowToDevCode) on CodePen.
Conclusion
If you want to learn JavaScript and you are looking for an editor / IDE, that has auto-completion / IntelliSense and debugger support, then Visual Studio might be the IDE of choice. We can easily create web projects that use JavaScript by creating an empty website and then simply adding HTML and JavaScript files. The only drawback is the debugging, since it seems to only work when the project is run in IE browser.
Which IDE do you prefer? Drop a comment and let us know.
How To Create A Javascript Project
Source: https://www.howtosolutions.net/2016/05/visual-studio-creating-javascript-project/
Posted by: bensonhaveracter.blogspot.com

0 Response to "How To Create A Javascript Project"
Post a Comment